The Raspberry Pi foundation has made available a Debian derived Linux distribution that has the same look and feel as Raspbian that runs on the ARM based Raspberry Pi but instead runs on a x86 based processor (PC or MAC). It can be run from a bootable flash drive or installed on the computers hard drive.
I have the Raspberry Pi up and running on a PC desktop. I believe this was the easiest install of a Linux desktop I have done. Often I have used Linux on older machines and chosen a light desktop like LXDE which was not the default for the distribution. This typically resulted in hours tweaking and not getting everything working just as it should. It seems with this version of Debian Stretch the RPi Foundation has done the tweaking and gotten it all right.
The ISO image was loaded onto the flash drive using rufus-2.18p.exe on a windows 7 computer. To ensure the persistence option will work it is important to choose the dd (entire disk image) option rather than the ISO (file by file) option.
Very nice the way it all works without needed to do a lot of configuration.
Quoting from the Raspberry Pi Blog:
Use the GPIO pins of a Raspberry Pi Zero while
running Debian Stretch on a PC or Mac with our
new GPIO expander software! With this tool,
you can easily access a Pi Zero’s GPIO pins
from your x86 laptop without using SSH, and
you can also take advantage of your x86
computer’s processing power in your physical
computing projects.This is something I plan to test.
In a terminal on the PC desktop after the RPi Zero (USB OTG port not PWR port) has been attached to the PC USB port. This connection will also provide power.
screen /dev/ttyACM0 115200
Username: root
Password: raspberry
One will get a "#" as a prompt. There will be a limited temporary file system on a RAM drive.
A bootable microSD would need to be removed to get the Zero to boot from the USB port rather than booting from the microSD.Once the boot is complete one can reinsert the microSD and mount it (it won't mount automatically).
First just to make sure the micro SD is detectable try:
# blkid
/dev/mmcblk0p2: UUID="202638e1-4ce4-45df-9a00-ad725c2537bb"
/dev/mmcblk0p1: LABEL="boot" UUID="22E0-C711"
I created a directory to be used as a mount point
# mkdir /mnt/sdthen mounted the microSD to that directory:
# mount -t ext4 /dev/mmcblk0p2 /mnt/sdIn my case I used a microSD already set up with Noobs on it. That is why it had been formatted with the ext4 file system. The disadvantage of formatting with ext4 is that only Linux systems can read it. FAT32 is more universal (but less rich in features).
The file system loaded correctly indicating the USB boot for the RPi Zero had worked successfully.
There is a section in https://www.raspberrypi.org/blog/stretch-pcs-macs-raspbian-update/ called New PC applications and it talks about PiServer. If PiServer is run on the RPi PC desktop, PiServer enables up to three Raspberry Pi 3s to do a network boot (over Ethernet).
I expect the following advantages over booting from a microSD:
Quoted from link given above:
We have included a couple of new applications in the PC version. One is called PiServer — this allows
you to set up an operating system, such as Raspbian, on the PC which can then be shared by a number
of Pi clients networked to it. It is intended to make it easy for classrooms to have multiple Pis all
running exactly the same software, and for the teacher to have control over how the software is
installed and used. PiServer is quite a clever piece of software, and it’ll be covered in more detail
in another blog post in December.
I will be watching for the new blog post. Raspberry Pi 3s are available from many sources. Raspberry Pi Zeros are not as easy to get in quantity or in a reasonable time.
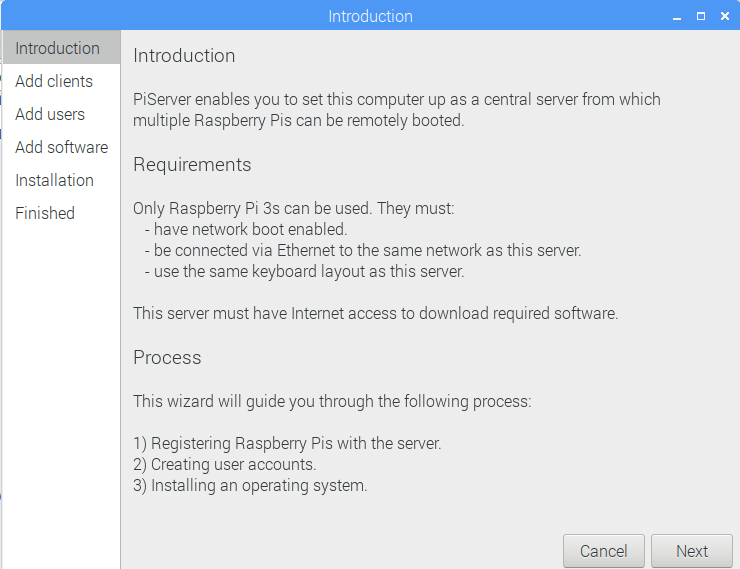
I have not yet seen the promised Blog entry on the PiServer but there is an introduction given if one goes to Preferences -> PiServer
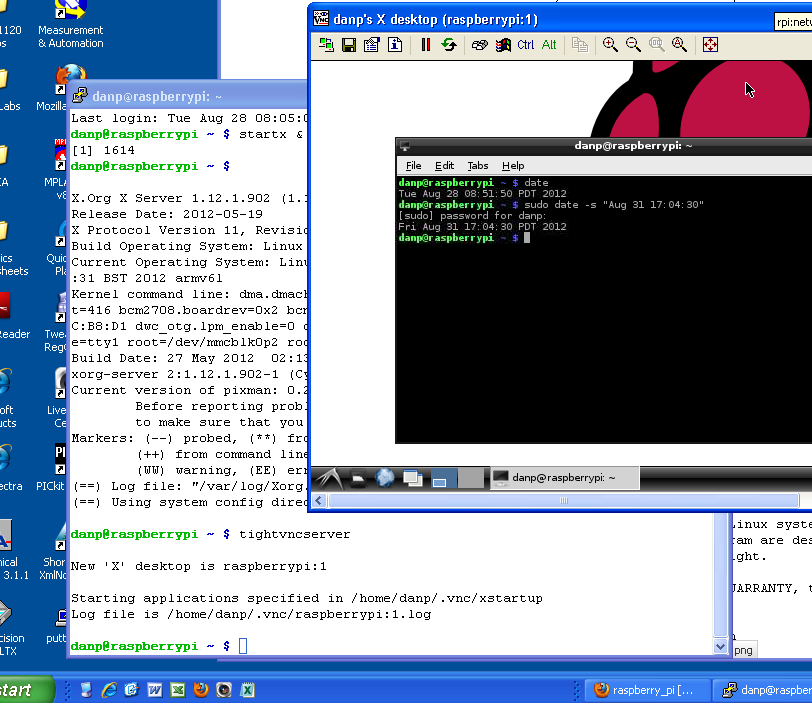
In some cases it would be advantageous to run a Raspberry Pi 3 headless. That is without a monitor, keyboard and mouse. On example is if one has access to a laptop. It is not hard to log into a Raspberry Pi remotely from a laptop connected to the same Ethernet router. In the past (2012) I did this with an original Raspberry Pi. I have not taken the time to try it with a new Raspberry Pi three but it would work much the same.
Here is an example of a Raspberry Pi desktop sitting on a windows XP desktop. This example used both a Virtual Network Computing (VNC) session and a Secure shell (SSH).
More on remote access on this old page from 2012:
One advantage of using a Debian desktop on the Laptop (PC) rather than the Windows boot is that Debian computers can find each other by computer name. That does not work out of the box with the Windows laptop connecting to the Debian RPi. In that case one needs to know the IP address of the Raspberry Pi.
At the moment I do not have a RPi 3 handy for testing so I am testing with two netbooks running the RPi version of Debian Stretch.
See example session below.
pi@proton:~ $ ssh electron.local
The authenticity of host 'electron.local (192.168.0.19)' can't be established.
ECDSA key fingerprint is SHA256:GZzJbOpMgXTSWbKvH7s6kTkZcFrcVpAheQid8TqJVho.
Are you sure you want to continue connecting (yes/no)? yes
Warning: Permanently added 'electron.local,192.168.0.19' (ECDSA) to the list of known hosts.
pi@electron.local's password:
Linux electron 4.9.0-4-686-pae #1 SMP Debian 4.9.51-1 (2017-09-28) i686

The programs included with the Debian GNU/Linux system are free software;
the exact distribution terms for each program are described in the
individual files in /usr/share/doc/*/copyright.

Debian GNU/Linux comes with ABSOLUTELY NO WARRANTY, to the extent
permitted by applicable law.
Last login: Wed Dec 20 14:26:05 2017 from 192.168.0.19
pi@electron:~ $
Avahi is already installed on RPi and Debian Stretch x86. This is what allows one to enter {hostname}.local on a Linux system rather than the IP address. Windows computers use a different protocol to allow the use of windows hostnames.
As shown in at Advantage of booting Laptop with the Debian Desktop one can use the hostname as an argument to the SSH command. The same could be done in the address bar of a web browser on Linux if the remote RPi is running a web service.
The Avahi service is running by default on the Debian x86 and RPi systems but there is an additional utility that can be useful if the avahi-utils package is added to the system using:
pi@proton:~ $ sudo apt-get install avahi-utilsOnce that instalation is done (internet access is needed) it will be possible to run avahi-resolution to find the IP address from the hostename or the hostname from the IP address.
pi@proton:~ $ avahi-resolve -a  192.168.0.19
192.168.0.19 electron.localpi@proton:~ $ avahi-resolve -n4 electron.local
electron.local 192.168.0.19Often it is handy to be able to find hosts on the local network. Perhaps one has a headless RPi and does not remember the hostname or IP address. The IP address cand be found from another Linux computer on the same local network with arp-scan if it has been installed.
It can be installed with:
pi@proton:~ $ sudo apt-get install arp-scan
Reading package lists... Done
Building dependency tree
Reading state information... Done
The following additional packages will be installed:
[snip]
Once installed it can be used as shown in this example:
pi@proton:~ $ sudo arp-scan --localnet
Interface: wlan0, datalink type: EN10MB (Ethernet)
Starting arp-scan 1.9 with 256 hosts (http://www.nta-monitor.com/tools/arp-scan/)
192.168.0.1 50:39:55:5c:8a:43   Cisco SPVTG
192.168.0.12    00:90:a9:35:e4:75   WESTERN DIGITAL
192.168.0.18    b4:99:ba:c3:40:e8   Hewlett-Packard Company
192.168.0.19    00:23:4e:8b:47:d5   Hon Hai Precision Ind. Co., Ltd.
192.168.0.13    d0:87:e2:c9:88:5c   (Unknown)

5 packets received by filter, 0 packets dropped by kernel
Ending arp-scan 1.9: 256 hosts scanned in 3.018 seconds (84.82 hosts/sec). 5 responded
Is a vendor comes up as unknown one can search google based on the first three hex numbers in the MAC hardware address. In the previous example I did a google search for d0:87:e2 Vendor and found the following page:
That page shows:
Search results for "d087e2"
MAC     Vendor
D087E2  Samsung Electronics Co.,Ltd

About MAC addressMAC address - Media Access Control address.
MAC addresses - hardware addresses that uniquely identifies each
node of a network. It is assigned by the vendor or manufacturer
and saved to the device memory.
According to the OSI model it is a second-level address. In
IEEE 802 networks Data Link Control (DLC) layer is divided into two
sub-layers:
    the Logical Link Control (LLC) layer
    and the Media Access Control (MAC) layer.
First 3 bytes (or 24 bits) of MAC addresses are known as the
Organizationally Unique Identifier (OUI) and usually encodes the
manufacturer.Today I set up a Raspberry Pi 3 headless using a lab computer. In the lab there are a limited number of ethernet drops available so I:
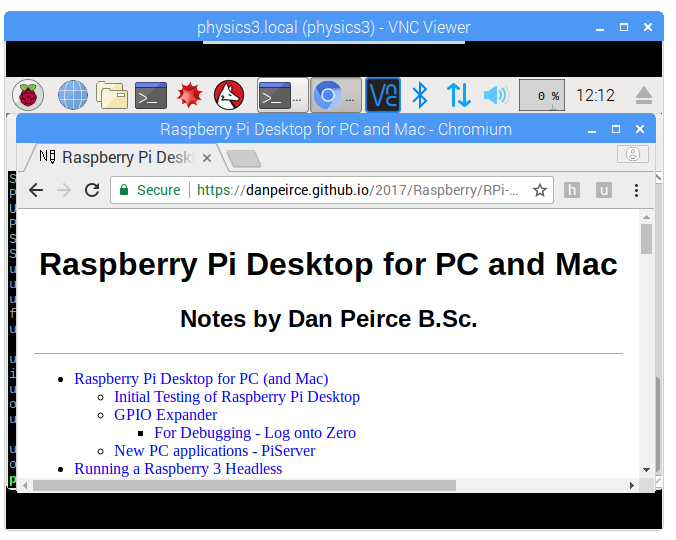
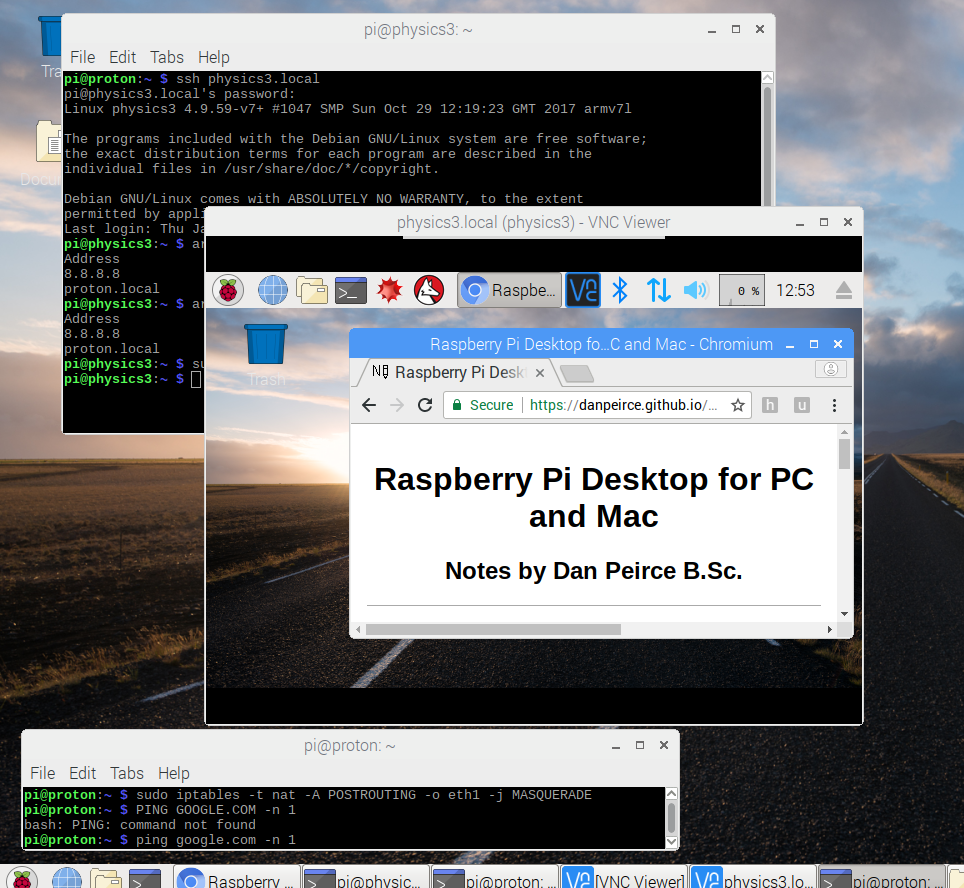
After step 8. one has a desktop from the Raspberry Pi 3 in a window on the PC. Connections between the Raspberry Pi and the Debian PC are working and the Debian PC can connect to the internet but other steps are needed to also get the Raspberry Pi to connect to the internet by having packets forwarded by PC (internet sharing).
This is needed in the case where the Raspberry Pi is connected directly to a PC via a crossover ethernet cable and the PC has a second ethernet port connecting it to the internet.
In a terminal on the PC one can use a secure shell into the Raspberry Pi and tell the Raspberry Pi the route to the gateway.
pi@proton:~ $ ssh physics3.local
pi@physics3.local's password:
Linux physics3 4.9.59-v7+ #1047 SMP Sun Oct 29 12:19:23 GMT 2017 armv7l

The programs included with the Debian GNU/Linux system are free software;
the exact distribution terms for each program are described in the
individual files in /usr/share/doc/*/copyright.

Debian GNU/Linux comes with ABSOLUTELY NO WARRANTY, to the extent
permitted by applicable law.
Last login: Thu Jan  4 09:47:58 2018 from 169.254.180.28
pi@physics3:~ $ sudo ip route add default via 169.254.180.28
pi@physics3:~ $
Then in a second terminal in the PC one can setup ip forwarding and a MASQUERADE to eth1 (assuming the Raspberry Pi is on eth0).
pi@proton:~ $ avahi-resolve -n4 physics3.local
physics3.local  169.254.4.162
pi@proton:~ $ sudo sysctl net.ipv4.ip_forward=1
net.ipv4.ip_forward = 1
pi@proton:~ $ sudo iptables -t nat -A POSTROUTING -o eth1 -j MASQUERADE
Once this has been done the Raspberry Pi will be able to find hosts on the internet.
I still have a Original Rasperry Pi B from 2012 and thought I would try it with the new Raspbian Stretch Light.
After the initial set-up was complete I ran the RPi B headless. On windows one can use PuTTY to obtain a secure shell. I find it more convenient to boot a netbook with a Debian Stretch USB boot.
pi@proton:~ $ sudo arp-scan --localnet
Interface: wlan0, datalink type: EN10MB (Ethernet)
Starting arp-scan 1.9 with 256 hosts (http://www.nta-monitor.com/tools/arp-scan/)
192.168.0.1 50:39:55:5c:8a:43   Cisco SPVTG
192.168.0.18    b4:99:ba:c3:40:e8   Hewlett-Packard Company
192.168.0.23    b8:27:eb:fc:b8:d1   Raspberry Pi Foundation
  [snip]

8 packets received by filter, 0 packets dropped by kernel
Ending arp-scan 1.9: 256 hosts scanned in 4.085 seconds (62.67 hosts/sec). 8 responded
pi@proton:~ $ avahi-resolve -a  192.168.0.23
192.168.0.23    electron1.local
pi@proton:~ $
pi@proton:~ $ ssh pi@electron1.local
The authenticity of host 'electron1.local (192.168.0.23)' can't be established.
ECDSA key fingerprint is SHA256:U3yD1M6/l1AniyZmnytlmMwcS0k03fJzQnU5VAE/N+k.
Are you sure you want to continue connecting (yes/no)? yes
Warning: Permanently added 'electron1.local,192.168.0.23' (ECDSA) to the list of known hosts.
pi@electron1.local's password:
Linux electron1 4.9.59+ #1047 Sun Oct 29 11:47:10 GMT 2017 armv6l

The programs included with the Debian GNU/Linux system are free software;
the exact distribution terms for each program are described in the
individual files in /usr/share/doc/*/copyright.

Debian GNU/Linux comes with ABSOLUTELY NO WARRANTY, to the extent
permitted by applicable law.
Last login: Sat Dec 30 00:55:16 2017 from 192.168.0.15
pi@electron1:~ $ An example of transferring a file with sftp.
pi@proton:~ $ sftp pi@electron1.local
pi@electron1.local's password:
Connected to electron1.local.
sftp> ls
sftp> lls
2017-12-26-010425_1024x600_scrot.png  Documents        Public
2017-12-29-160212_1024x600_scrot.png  Downloads        python_games
arp-scan-before.txt           gparted-resized.png  Templates
arp-scan-rpi.txt              Music        Videos
danpeirce.github.io           Pictures
Desktop                   pref-piserver.png
sftp> put arp-scan-rpi.txt
Uploading arp-scan-rpi.txt to /home/pi/arp-scan-rpi.txt
arp-scan-rpi.txt                              100%  499     5.7KB/s   00:00
sftp> ls
arp-scan-rpi.txt
sftp> It is possible to enable a USB bootmode on the Raspberry Pi 3.